Showing posts with label 1860's. Show all posts

Monday, December 1, 2025

1863 Thanksgiving, 2025 edition, and a little Myth Busting

For years (YEARS) I have been telling museum visitors “sorry, I don’t have recipes to hand out. I can give you the cookbook names but the directions will be 19th century language. I really should put them on my blog”. Time to make myself do what I keep saying I should do.

A change in kitchens this year also gave me a chance to do a little personal experimentation with myth busting. I spent the weekend cooking in Old Bethpage Village Restoration’s Conklin House. I’m not going to go through the whole history, the general idea though is that Joseph Conklin and his wife weren’t exactly high on the economic scale. It’s a cute and cozy house with everything a young family needs but nothing extra. The kitchen is small, the hearth is very small, and work surfaces are quite limited. More times than I care to count I have listened to museum staff, at multiple museums, talk about kitchens like this saying that all meals were one-pot dishes hung over the fire. I’ve never quite bought into this idea and I haven’t felt it was supported by mid century literature. I wanted to see if I could get a slightly fancier meal on the table. 


My Menu, My Plan, and How it Varied From a Probably Reality

My menu was roast chicken, stuffed, roasted root vegetables, pumpkin pie, and sweet potato rolls. I was also making a turkey pie using leftovers, not something that would have been on their Thanksgiving day table. What more might Mrs Conklin have cooked? Probably some more vegetables (pureed squash, creamed onions, etc.), cranberry or applesauce, maybe a chicken pie, maybe another pie or a boiled pudding. Mrs Conklin would have had the benefit of using a kitchen she was used to cooking in and was equipped for how she cooked, and not using a hearth and bake oven for the first time. I did three bits of prep in a modern kitchen: I cooked and sieved the pumpkin (no sieve at the museum and it needed time to cool). I made the dough for the rolls, for good flavor yeast bread just really needs a longer rise than you can accomplish in the hours we have. I unpacked the chicken to make sure it wasn’t frozen through and dried it enough that I wouldn’t have to deal with a drippy raw chicken mess. One more bit of saved prep, I used commercial bread crumbs instead of grating stale bread. Mrs. Conklin likely would have made the pies, and maybe the rolls, ahead. Things like cranberry sauce or applesauce would likely have also been already made, boiled puddings would also be made ahead and reheated. I got the chicken off the fire later than they would have eaten dinner, but I couldn’t start my fire when she would have, she also didn’t have to haul equipment and set up a rarely used kitchen. She also didn’t lose about 20% of her kitchen to a traffic path for visitors. I don’t think the little I did at home gave me any advantage in the end. 


The Result?

By the end of the day I had a nicely roasted stuffed chicken with root vegetables, rolls, and two pies on the table. A “fancy” meal? No, there were certainly more complicated foods in cookbooks of the day. For the particular holiday there might have just been more, especially if they had company, my chicken was closer to the size of their turkeys and not enough for a larger party so their might have been a beef or pork roast of some sort, maybe a fish or shellfish dish (true for any household on Long Island but especially for the Conklins as Mr. Conklin was a bayman). Success? Yes, clearly these really small kitchens could produce a nice, multiple component, meal using multiple different cooking methods. 


Recipes, or, Receipts in 19th Century Parlance

The pumpkin pie and sweet potato rolls were new receipts to me. Both worked well, the pumpkin pie especially was a hit. I started with a Long Island Cheese pumpkin, an heirloom variety that was available in the mid 19th century, which has a nice sweet flesh. 


 Pumpkin Pie

The Improved Housewife: Or, Book of Receipts; with Engravings for Marketing and Carving, 1847, Mrs. A. L. Webster, A married lady, https://books.google.com/books?id=6G4EAAAAYAAJ


 1 cup pumpkin puree
2 cups milk
3 eggs
½ cup sugar
Peel of half a lemon, shredded finely
1/4 teaspoon nutmeg
½ teaspoon ginger
Beat eggs, add remaining ingredients. Pour into pie crust and bake @ 50 minutes at 325. Or, blind bake pie crust @ 15 minutes, fill and drop temp to 325 not waiting for the oven to cool and bake for @ 40. The center should be jiggly but not liquidy, a knife inserted in the center should come out clean.


Mrs. Cushing’s Sweet Potato Rolls
The Improved Housewife: Or, Book of Receipts; with Engravings for Marketing and Carving, 1847, Mrs. A. L. Webster, A married lady, https://books.google.com/books?id=6G4EAAAAYAAJ

 ¾ Cup mashed, cooked, sweet potato (cold or slight warm, either way mash while warm)
2 Tablespoons very soft butter
½ teaspoon salt
1 packet yeast
¼ Cup warm water
4 Cups flour, with extra
Oil
Sprinkle yeast on warm water. Add salt, butter, sweet potato, and @ 2 cups of the flour, mix until everything is well incorporated. Mix in another cup of flour mixing until incorporated, continue adding flour until no longer sticky. Flour a work surface and knead until a dent from poking the dough bounces back. Place in a very lightly oiled bowl, turn to oil all sides, cover and let rise until doubled. Punch down. A second rise is optional but may give a better flavor. Shape into rolls about 1 ½ in diameter and place on an oiled sheet or pan, let rise about 20 minutes and back at 350 for @ 25 minutes. 


Roast Stuffed Chicken with Root Vegetables
This is a conglomeration of multiple mid 19th century receipts. I need to add that modern food safety experts will tell you not to stuff your poultry.
1 roasting chicken
@ 2 Tablespoons minced salt pork (or bacon, or sausage)
@ ¼ Cup minced onion
@ ¾ Cup bread crumbs
1 egg
water
@ ½ teaspoon sage or other dried herbs (I used Bell’s Seasoning which hit the market just a few years later)
4 – 5 cups potatoes, carrots, and parsnips cut into large chunks
Remove neck and any giblets from chicken, pat dry. Sautee the salt pork (historically they used it raw but I prefer to precook any meats going into stuffing), onions can be sauteed along with it or used raw. Beast egg and add pork and onions, mix in breadcrumbs and seasoning. Add water to moisten, how much depends on how moist you like your stuffing, anywhere from wet crumbles to more like cooked oatmeal. Close with skewers or toothpicks (or sew shut with cotton kitchen string, either dispose of needle or scrub it well afterwards) and tie legs. Scatter vegetables around the chicken. If the bird is small and will roast in less than @ 1 ¼ hours first parboil them to ensure they cook through. Roast at 350 for @ 15-20 minutes a pound, temperature at thickest part of thigh should be 165.

Saturday, July 9, 2011

Mitts, Cuffs and Muffatees, Oh My!

Or
Everything Old is New Again

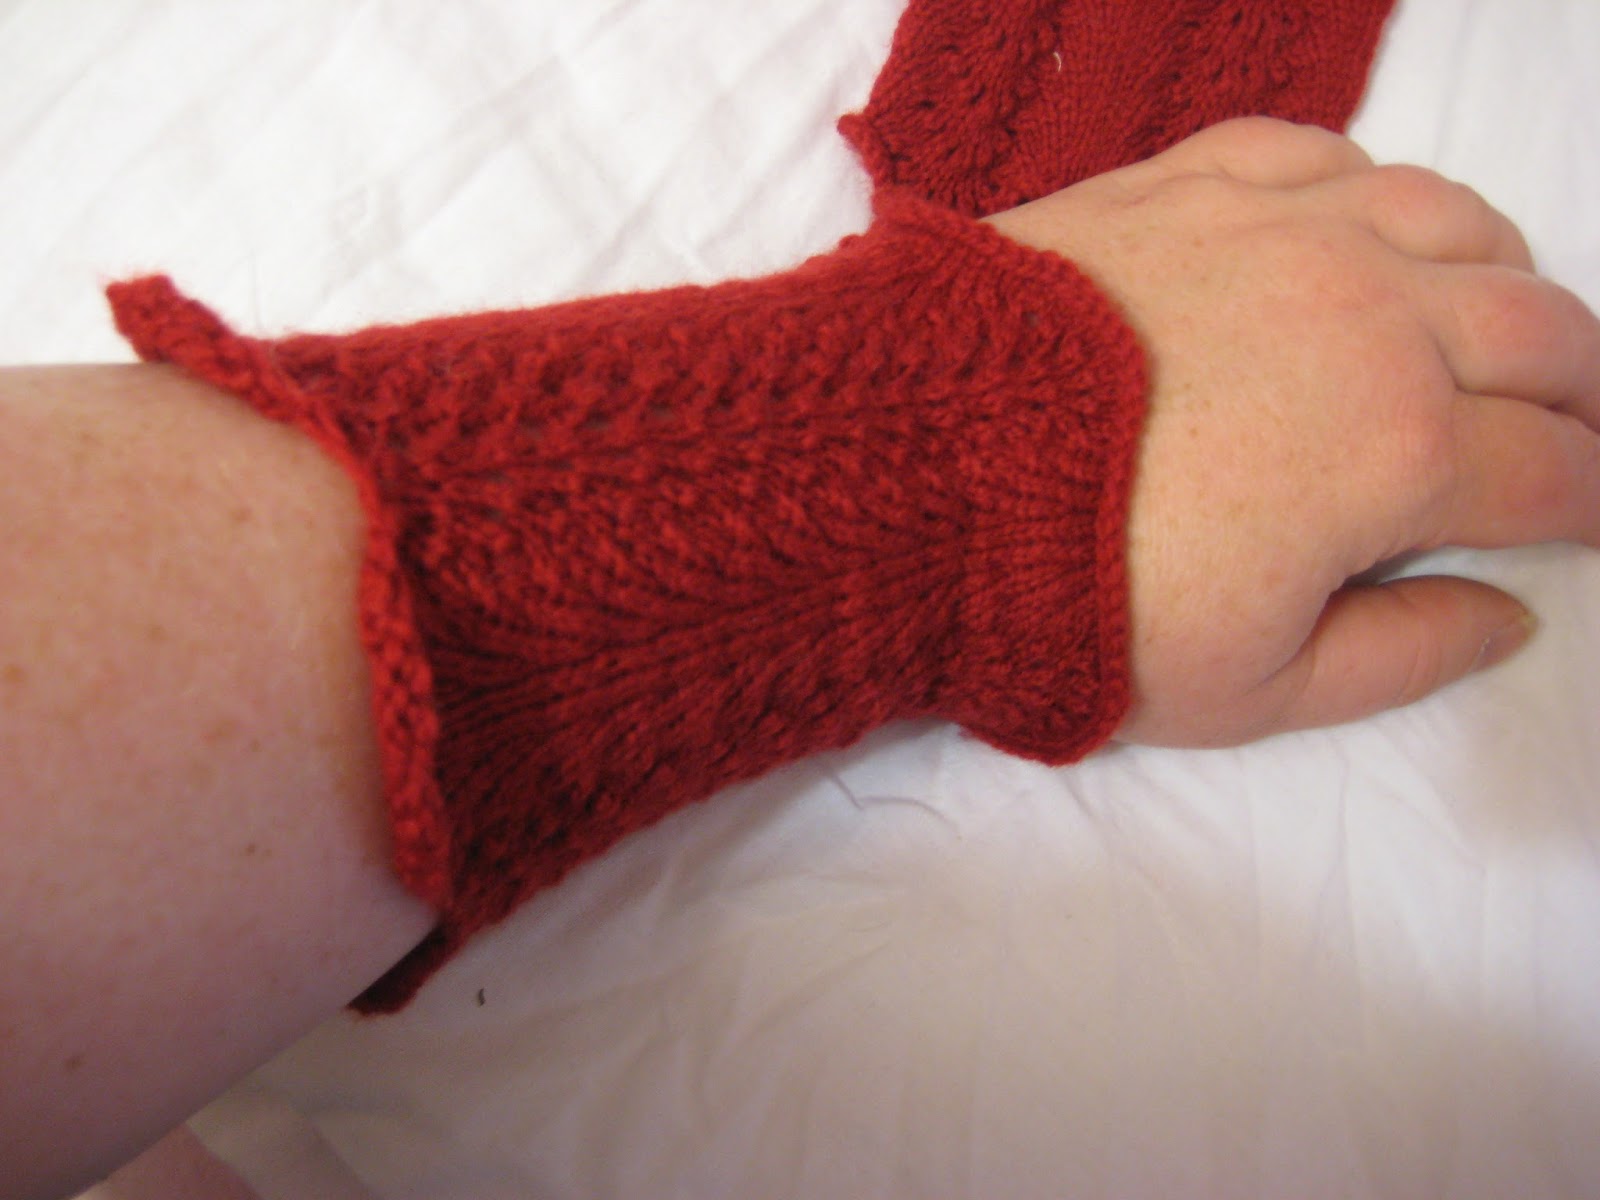
The past few years there has been a slow but growing trend for various forms of knit handwear, from short little mitts to long gauntlet like mitts, some with partial fingers, some a thumb hole and other just a long shoved down cuff. They are nothing new, I have been quite amused at the several "new and novel" items which have wound their way into "modern" knitting in the past few years. Various knit hand warming devices have been around for a long, long time. Their existence long predates my era of study. The first print instructions I know of appear in the 1838 Workwoman's Guide, http://books.google.com/books?id=8OcDAAAAQAAJ. WWG offered patterns for muffatees, mittens, andt mitts, in all 10 patterns, out numbered only by foot coverings. It tells you something about the life of our ancestors before central heat, staying warm was a struggle. WWG offered plain and utilitarian styles, but that was the gist of the whole book. Like all clothing items (at least it seems all) they transcended simple form and joined the ranks of fashion items. Many of the knitting books published in the next few decades offered more fanciful versions - fancy stitches, lacework, multicolored, anything to make the common item pretty. They persist in some form from one end of the Victorian era to the other. Which was favored - mitt versus cuff and so on - varied from era to era but they all had two things in common. They were knit on small needles (00-2) and they were knit on fine yarn (almost always) modern fingering weight . This is where they diverge from the modern versions. Modern knitters make them from heavy and chunky wools assuming that will keep them warm. But then modern people wear them to wander a chilly street while shopping not to try to run a household. The finer historic version lets the wearer layer, a muffatee could be slipped on over a thin glove to extra warmth without hampering hand use as a heavy item would and they can be worn for housework without destroying dexterity. Most stitches used provide some stretch and flexibility allowing for a snug fit, a loose and floppy will make them cumbersome to wear if you try to do any real work. 

They are small and knit up quickly, a great way to use up scraps of yarn, and a nice project which can let a newer knitter produce a finished project (relatively) quickly.  As a very visible costume item they also get noticed and are good conversation starter leading to conversations about not just knitting but the difficulties in keeping a house warm and trying to keep oneself warn while working outdoors. One word of caution if you want to knit some - many of the patterns end up rather small so swatch the pattern stitch and adjust the stitch count accordingly. You can try going up or down one needle size but unless your knitting is extremely tight or loose changing needle size more than that will alter the texture of the knitting too  much. Below are some pictured of some styles ranging through the Victorian era. All were knit for a knitting workshop I recently taught at the national ALHFAM conference.

 Knit Muffatee, Workwoman's Guide, 1838


Corkscrew Muffatee, Exercises in knitting, 1846 


Feather Mits, The ladies’ self instructor in millinery and mantua making, 1853


Winter Cuffs in Double Knitting, Godey’s Lady’s Book and Magazine, February 1861


Lady's  Mitten with Thumb, Weldon’s Practical Knitter, First Series. 188x


Knitted Cuffs, The art of knitting, 1991


Wednesday, December 16, 2009

MyLITV.com - Thanksgving in 1863 Long Islands Best Videos Politics and Local News

MyLITV.com - Thanksgving in 1863 Long Islands Best Videos Politics and Local News

There is an odd trend in my life - me being photographed or videotaped with a turkey. No, not one of my friends but a Thanksgiving turkey, mid-roast in a tin kitchen. Here is this year's version - more views of me with my backside up in the air, more shots of the part(s) in my hair, and as always, wearing the most frumpy thing I own! The pie shown in the Dutch oven is the apple pie in the previous post.

Contrary to appearances I did not do all of the cooking. The two other ladies in the kitchen just "volunteered" me to do the talking. Someday I'll return that favor!

Monday, November 30, 2009

Pies, pies, pies, and more

Every year Old Bethpage Village celebrates Thanksgiving with two weekends of cooking. We do our best to make Sarah Josepha Hale proud. For me this usually means two days in an 1866 house with a cook stove and two days in a 1861 (1820-ish restored to 1861) house with a large hearth. Officially, that means two turkeys and two batches if succotash, unofficially it means turkey, succotash, and anything else that inspired us. For whatever reason pies seemed to be the thing for me this year.

I started with a potato pie. Think escalloped potatoes with a pastry lid. Before we had casserole dishes with nice glass lids pastry seems to have served that purpose. Layers of sliced potatoes with minced onion, some salt, a little water, butter and nutmeg. The nutmeg is the surprise, and it was a very nice surprise. The basic receipt shows up in virtually every cookbook I looked at from the earliest to well after the Civil War. Some suggested adding meat in between the layers and others seasoned it with various sauces and ketchups. Just one version, from Godey's in 1856, http://books.google.com/books?id=R8dMAAAAMAAJ&pg=PA173#v=onepage&q=&f=false

Pie number two was turkey. We do a lot with leftovers. As mundane as leftovers seem the visitors ask many questions about it. Most any cookbook discusses mincing up leftover meats and mixing it with leftover vegetables. Depending on what you have it can turn into a hash or be mixed with some gravy for a pie or pasties. I went for a pie - we're a bit crunched for space and don't have a cutting board large enough for rolling pastry so the less I have to handle dough the better. My pie was simple - leftover turkey, potatoes, carrots, and onions all mixed with some gravy and stock to loosen it up a bit. And a little pepper for good measure. Various receipts suggest adding forcemeat balls or slices of hard cooked egg. I stuck with simple. Many meat pies had only side and top crusts, or some just the top - again a lid. Meat pies with a raised crust usually used a lard crust but I found a few references to using puff pastry for top only pies and I went with that. Once the crusts on these pies cooks it can actually be lifted off - intact. That lets the cook add more gravy or seasoning or even to pour out the gravy so they could keep the pie for a few days without it getting too soggy. Several visitors thought this pie was a fake - a plastic prop, I'm still trying to decided if the was a compliment or an insult!


Puff paste in all of its many-splendored layers. This makes a very delicate but very sturdy crust. And, it's easy to handle!


The third pie was Catherin Beecher's "Little Girl's Pie", http://books.google.com/books?id=2HIEAAAAYAAJ&pg=PA105#v=onepage&q=&f=false, an apple pie with much molasses. Several variations showed up through the years. Molasses is a bit of an acquired taste that the modern palate might not be accustomed to. Beecher's receipt started with a spiced and sugar sweetened pie and added molasses, I picked this one not just because it was the first of the genre I found but because I thought it might be better for our modern taste buds. I had a mixed bag of apples, quite literally. Some probably weren't as strongly flavored as they should be to stand up to molasses but the mix worked well. I added sugar (a bit much for my tastes as I was distracted speaking to some visitors while I added it), cinnamon, cloves, and ginger. I used a rich crust so I dispensed with the butter so often added to a  pie. Usually I bake single crust pies in a dutch oven, I've never thought it through, it just seemed to happen that way. Single crusts work better. A pie crust needs to bake not steam and with an apple pie steam it did! Getting the crust to cook well was a challenge. It came out of the oven just over an hour before closing so it was still pretty warm when the tasting commenced. Evidently we all like molasses, everyone who tried it came back for more. It is more rich than a typical apple pie so some people might like smaller pieces, I'm thinking it would also be really nice with a bit of good vanilla ice cream - not quite an 1860's tradition but it sounds good!


Did we live on just pies, turkey and succotash - oh no! There was cake, turkey soup, vegetable soup, rolls from a rice bread dough, plum pudding, boiled indian pudding, apple fritters...and much more I'm forgetting. Definitely a spread that someone might travel over the mountain and through the woods to feast upon.

Thursday, September 24, 2009

The many beaded bag


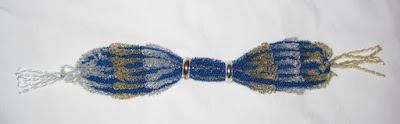
I've received so many questions about this little miser's purse that I thought I would put the instructions and my notes online. Purely self-serving as it means I just need to remember a link instead of hunting through my computer looking for an email to forward. This is "Lady's Purse" from the October 1863 Godey's. So far, this is the only publication where I have seen this purse. The technique though seems to have been fairly common, I have seen several for sale online or in antique stores (including one store in MA which had a matched pair!) and in museum collections.

This one is in the Bowes Museum in England,


Unfortunately I don't remember where I found this one. I love the color!

This one is in the Met,


Back to my version:


I knit it with size "E" Gudebrod silk and size 14/0 seed beads, both available from Fire Mountain Gems ,on 0000 needles. The rings came from Lacis. The original instructions called for alternating bands - blue silk with steel beads and white with gold beads. This little thing uses A LOT of beads, not counting the tassels it has about 8000 beads!


The original instructions:
Cast on forty-eight stitches, work four plain rows, then commence the pattern thus:— 1st row.— Make 1, purl 2 together, *, pass down 14 beads, keep them under the thumb, make 1, purl 2 together, make 1, purl 2 together; repeat from *. 2d.— The return row to be worked in the same stitch, but without beads. 3d.— As the first, only pass down 13 beads instead of 14. Every row the same with 1 bead less, until only 2 beads remain; then work the return row, and join on the white silk and gold beads. *, pass down 14 beads, make 1, purl 2 together, make 1, purl 2 together; repeat from *. The other row same as the blue and steel; then repeat the blue and steel once more. This forms one end of the purse . The middle may be worked thus:— With white and gold beads make 1, purl 2 together, pass down 2 beads; repeat; return row plain. Repeat these two rows four times in white, four times in blue, four times in white. Then commence the other end in blue; work the same as before, only commence with 2, and increase to 14 beads. Sew up one-third at each end, and trim with mixed gold and steel tassels.

I made only one change, I added two stitched so I would have an edge stitch instead of doing a yarn over at the ends. So, I started each row with one purl and ended each row with one purl. That also gave me a nice clean edge for seaming it. Stringing the beads is a bit of a challenge, a needle small enough to go through the beads is too small for the thread. If you are stubborn you can get the thread into the needle, otherwise try gluing the end of the thread to stiffen it enough to get through the beads. I strung the beads in sections, estimating how many beads were on the thread and adding many more for goo measure than just snipped the thread and took off the spares before stringing the next set. Due to the nature of how this is knit the beads on the opposite ends will hang slightly differently. Only the most observant people might notice this given the distraction of the many beads.

  Pattern published for personal, non-commercial use only

Friday, September 4, 2009

Godey's 1865 Fichu or Necktie

This cute little tie appeared in Godey's in June 1865. It looked simple and different, two things I like. It is quite simple to knit up. It is however kind of wonky to wear. Knit by the direction's row count I came up with a tie just long enough to wrap around my neck and either cross the ends flat or do just a little half knot. It's cute but just doesn't look right for the 60's. It seems to be an accessory before it's time, presaging the higher, frilly and fussy neck adornments of the 70's. It is a great example of how warm lace is if you make it from wool. Somewhat skeptical of how to wear it I crossed the ends and put my brooch on and ventured out for a very cold Candlelight Evening at Old Bethpage Village last December. It was cold enough to flash freeze inches deep mud from the previous day's storm but my neck was toasty, definitely better than a cotton collar that night.

The center ground was knit up in fingering weight wool and size 4 needles and the edge in "scraps" of some lace weight and 0 needles. The stitches are simple, this would make a good introduction to basic lace stitches.
From Mostly pointless drivel

Wednesday, September 2, 2009

Double Knitting Part 2

The exploration into double knitting started because of a KAL in the cwneedleworkerskal group. The project in question is "Winter cuffs in double knitting" which showed up in Godey's in 1861 and made appearances in several other publications around the same time, http://books.google.com/books?ei=LRGfSoXRLI7ayASroLDuDg&q=%22winter+cuffs+in+double+knitting%22&btnG=Search+Books. Since 19th century patterns offer no clue to what gauge the knitter should strive for I always do sample swatches. There are several ways of doing double knitting, each creating a different fabric. Since there was some debate about the various methods I decided to do a swatch of each. All were done with the same yarn, needles and number of stitches -fingering weight, size 4 (modern size) and 20 stitches.

The first was done with the method used in my original post. To my reading this the technique the writer intended. I got a soft fabric with some nice loft and a reasonable amount of stretch. This would make a cuff which would fit snugly on my wrist. But my wrists are small, most women might need to add a few stitches.
From Mostly pointless drivel
Method two has you wrap the thread twice around the needle for each knit stitch. This creates a long stitch and a looser fabric. With my tension this creates something much too open and soft for this project.
From Mostly pointless drivel

The third method is the easiest to stitch, the yarn is not flipped forwards and backwards you simply knit and slip, and knit and slip. This though produces a garter stitch fabric instead of the stockinette the first version gives. For me it also knit up a good bit tighter.
From Mostly pointless drivel
When I make my cuffs I'll use the first method as the pattern called for. And just because I like red and white I'll likely use the specified colors. First though I need to finish some projects already started. First up to focus on - my pine apple bag from  The ladies' work-table book (1845). More on pine apple bags when it's done.


From Mostly pointless drivel