Showing posts with label Godey's. Show all posts

Thursday, September 24, 2009

The many beaded bag


I've received so many questions about this little miser's purse that I thought I would put the instructions and my notes online. Purely self-serving as it means I just need to remember a link instead of hunting through my computer looking for an email to forward. This is "Lady's Purse" from the October 1863 Godey's. So far, this is the only publication where I have seen this purse. The technique though seems to have been fairly common, I have seen several for sale online or in antique stores (including one store in MA which had a matched pair!) and in museum collections.

This one is in the Bowes Museum in England,


Unfortunately I don't remember where I found this one. I love the color!

This one is in the Met,
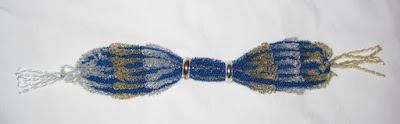

Back to my version:


I knit it with size "E" Gudebrod silk and size 14/0 seed beads, both available from Fire Mountain Gems ,on 0000 needles. The rings came from Lacis. The original instructions called for alternating bands - blue silk with steel beads and white with gold beads. This little thing uses A LOT of beads, not counting the tassels it has about 8000 beads!


The original instructions:
Cast on forty-eight stitches, work four plain rows, then commence the pattern thus:— 1st row.— Make 1, purl 2 together, *, pass down 14 beads, keep them under the thumb, make 1, purl 2 together, make 1, purl 2 together; repeat from *. 2d.— The return row to be worked in the same stitch, but without beads. 3d.— As the first, only pass down 13 beads instead of 14. Every row the same with 1 bead less, until only 2 beads remain; then work the return row, and join on the white silk and gold beads. *, pass down 14 beads, make 1, purl 2 together, make 1, purl 2 together; repeat from *. The other row same as the blue and steel; then repeat the blue and steel once more. This forms one end of the purse . The middle may be worked thus:— With white and gold beads make 1, purl 2 together, pass down 2 beads; repeat; return row plain. Repeat these two rows four times in white, four times in blue, four times in white. Then commence the other end in blue; work the same as before, only commence with 2, and increase to 14 beads. Sew up one-third at each end, and trim with mixed gold and steel tassels.

I made only one change, I added two stitched so I would have an edge stitch instead of doing a yarn over at the ends. So, I started each row with one purl and ended each row with one purl. That also gave me a nice clean edge for seaming it. Stringing the beads is a bit of a challenge, a needle small enough to go through the beads is too small for the thread. If you are stubborn you can get the thread into the needle, otherwise try gluing the end of the thread to stiffen it enough to get through the beads. I strung the beads in sections, estimating how many beads were on the thread and adding many more for goo measure than just snipped the thread and took off the spares before stringing the next set. Due to the nature of how this is knit the beads on the opposite ends will hang slightly differently. Only the most observant people might notice this given the distraction of the many beads.

  Pattern published for personal, non-commercial use only

Friday, September 4, 2009

Godey's 1865 Fichu or Necktie

This cute little tie appeared in Godey's in June 1865. It looked simple and different, two things I like. It is quite simple to knit up. It is however kind of wonky to wear. Knit by the direction's row count I came up with a tie just long enough to wrap around my neck and either cross the ends flat or do just a little half knot. It's cute but just doesn't look right for the 60's. It seems to be an accessory before it's time, presaging the higher, frilly and fussy neck adornments of the 70's. It is a great example of how warm lace is if you make it from wool. Somewhat skeptical of how to wear it I crossed the ends and put my brooch on and ventured out for a very cold Candlelight Evening at Old Bethpage Village last December. It was cold enough to flash freeze inches deep mud from the previous day's storm but my neck was toasty, definitely better than a cotton collar that night.

The center ground was knit up in fingering weight wool and size 4 needles and the edge in "scraps" of some lace weight and 0 needles. The stitches are simple, this would make a good introduction to basic lace stitches.
From Mostly pointless drivel

Wednesday, September 2, 2009

Double Knitting Part 2

The exploration into double knitting started because of a KAL in the cwneedleworkerskal group. The project in question is "Winter cuffs in double knitting" which showed up in Godey's in 1861 and made appearances in several other publications around the same time, http://books.google.com/books?ei=LRGfSoXRLI7ayASroLDuDg&q=%22winter+cuffs+in+double+knitting%22&btnG=Search+Books. Since 19th century patterns offer no clue to what gauge the knitter should strive for I always do sample swatches. There are several ways of doing double knitting, each creating a different fabric. Since there was some debate about the various methods I decided to do a swatch of each. All were done with the same yarn, needles and number of stitches -fingering weight, size 4 (modern size) and 20 stitches.

The first was done with the method used in my original post. To my reading this the technique the writer intended. I got a soft fabric with some nice loft and a reasonable amount of stretch. This would make a cuff which would fit snugly on my wrist. But my wrists are small, most women might need to add a few stitches.
From Mostly pointless drivel
Method two has you wrap the thread twice around the needle for each knit stitch. This creates a long stitch and a looser fabric. With my tension this creates something much too open and soft for this project.
From Mostly pointless drivel

The third method is the easiest to stitch, the yarn is not flipped forwards and backwards you simply knit and slip, and knit and slip. This though produces a garter stitch fabric instead of the stockinette the first version gives. For me it also knit up a good bit tighter.
From Mostly pointless drivel
When I make my cuffs I'll use the first method as the pattern called for. And just because I like red and white I'll likely use the specified colors. First though I need to finish some projects already started. First up to focus on - my pine apple bag from  The ladies' work-table book (1845). More on pine apple bags when it's done.


From Mostly pointless drivel