MyLITV.com - Thanksgving in 1863 Long Islands Best Videos Politics and Local News
There is an odd trend in my life - me being photographed or videotaped with a turkey. No, not one of my friends but a Thanksgiving turkey, mid-roast in a tin kitchen. Here is this year's version - more views of me with my backside up in the air, more shots of the part(s) in my hair, and as always, wearing the most frumpy thing I own! The pie shown in the Dutch oven is the apple pie in the previous post.
Contrary to appearances I did not do all of the cooking. The two other ladies in the kitchen just "volunteered" me to do the talking. Someday I'll return that favor!
Wednesday, December 16, 2009
Monday, November 30, 2009
Pies, pies, pies, and more
Every year Old Bethpage Village celebrates Thanksgiving with two weekends of cooking. We do our best to make Sarah Josepha Hale proud. For me this usually means two days in an 1866 house with a cook stove and two days in a 1861 (1820-ish restored to 1861) house with a large hearth. Officially, that means two turkeys and two batches if succotash, unofficially it means turkey, succotash, and anything else that inspired us. For whatever reason pies seemed to be the thing for me this year.
I started with a potato pie. Think escalloped potatoes with a pastry lid. Before we had casserole dishes with nice glass lids pastry seems to have served that purpose. Layers of sliced potatoes with minced onion, some salt, a little water, butter and nutmeg. The nutmeg is the surprise, and it was a very nice surprise. The basic receipt shows up in virtually every cookbook I looked at from the earliest to well after the Civil War. Some suggested adding meat in between the layers and others seasoned it with various sauces and ketchups. Just one version, from Godey's in 1856, http://books.google.com/books?id=R8dMAAAAMAAJ&pg=PA173#v=onepage&q=&f=false
Pie number two was turkey. We do a lot with leftovers. As mundane as leftovers seem the visitors ask many questions about it. Most any cookbook discusses mincing up leftover meats and mixing it with leftover vegetables. Depending on what you have it can turn into a hash or be mixed with some gravy for a pie or pasties. I went for a pie - we're a bit crunched for space and don't have a cutting board large enough for rolling pastry so the less I have to handle dough the better. My pie was simple - leftover turkey, potatoes, carrots, and onions all mixed with some gravy and stock to loosen it up a bit. And a little pepper for good measure. Various receipts suggest adding forcemeat balls or slices of hard cooked egg. I stuck with simple. Many meat pies had only side and top crusts, or some just the top - again a lid. Meat pies with a raised crust usually used a lard crust but I found a few references to using puff pastry for top only pies and I went with that. Once the crusts on these pies cooks it can actually be lifted off - intact. That lets the cook add more gravy or seasoning or even to pour out the gravy so they could keep the pie for a few days without it getting too soggy. Several visitors thought this pie was a fake - a plastic prop, I'm still trying to decided if the was a compliment or an insult!

Puff paste in all of its many-splendored layers. This makes a very delicate but very sturdy crust. And, it's easy to handle!

The third pie was Catherin Beecher's "Little Girl's Pie", http://books.google.com/books?id=2HIEAAAAYAAJ&pg=PA105#v=onepage&q=&f=false, an apple pie with much molasses. Several variations showed up through the years. Molasses is a bit of an acquired taste that the modern palate might not be accustomed to. Beecher's receipt started with a spiced and sugar sweetened pie and added molasses, I picked this one not just because it was the first of the genre I found but because I thought it might be better for our modern taste buds. I had a mixed bag of apples, quite literally. Some probably weren't as strongly flavored as they should be to stand up to molasses but the mix worked well. I added sugar (a bit much for my tastes as I was distracted speaking to some visitors while I added it), cinnamon, cloves, and ginger. I used a rich crust so I dispensed with the butter so often added to a pie. Usually I bake single crust pies in a dutch oven, I've never thought it through, it just seemed to happen that way. Single crusts work better. A pie crust needs to bake not steam and with an apple pie steam it did! Getting the crust to cook well was a challenge. It came out of the oven just over an hour before closing so it was still pretty warm when the tasting commenced. Evidently we all like molasses, everyone who tried it came back for more. It is more rich than a typical apple pie so some people might like smaller pieces, I'm thinking it would also be really nice with a bit of good vanilla ice cream - not quite an 1860's tradition but it sounds good!


Did we live on just pies, turkey and succotash - oh no! There was cake, turkey soup, vegetable soup, rolls from a rice bread dough, plum pudding, boiled indian pudding, apple fritters...and much more I'm forgetting. Definitely a spread that someone might travel over the mountain and through the woods to feast upon.
I started with a potato pie. Think escalloped potatoes with a pastry lid. Before we had casserole dishes with nice glass lids pastry seems to have served that purpose. Layers of sliced potatoes with minced onion, some salt, a little water, butter and nutmeg. The nutmeg is the surprise, and it was a very nice surprise. The basic receipt shows up in virtually every cookbook I looked at from the earliest to well after the Civil War. Some suggested adding meat in between the layers and others seasoned it with various sauces and ketchups. Just one version, from Godey's in 1856, http://books.google.com/books?id=R8dMAAAAMAAJ&pg=PA173#v=onepage&q=&f=false
Pie number two was turkey. We do a lot with leftovers. As mundane as leftovers seem the visitors ask many questions about it. Most any cookbook discusses mincing up leftover meats and mixing it with leftover vegetables. Depending on what you have it can turn into a hash or be mixed with some gravy for a pie or pasties. I went for a pie - we're a bit crunched for space and don't have a cutting board large enough for rolling pastry so the less I have to handle dough the better. My pie was simple - leftover turkey, potatoes, carrots, and onions all mixed with some gravy and stock to loosen it up a bit. And a little pepper for good measure. Various receipts suggest adding forcemeat balls or slices of hard cooked egg. I stuck with simple. Many meat pies had only side and top crusts, or some just the top - again a lid. Meat pies with a raised crust usually used a lard crust but I found a few references to using puff pastry for top only pies and I went with that. Once the crusts on these pies cooks it can actually be lifted off - intact. That lets the cook add more gravy or seasoning or even to pour out the gravy so they could keep the pie for a few days without it getting too soggy. Several visitors thought this pie was a fake - a plastic prop, I'm still trying to decided if the was a compliment or an insult!


The third pie was Catherin Beecher's "Little Girl's Pie", http://books.google.com/books?id=2HIEAAAAYAAJ&pg=PA105#v=onepage&q=&f=false, an apple pie with much molasses. Several variations showed up through the years. Molasses is a bit of an acquired taste that the modern palate might not be accustomed to. Beecher's receipt started with a spiced and sugar sweetened pie and added molasses, I picked this one not just because it was the first of the genre I found but because I thought it might be better for our modern taste buds. I had a mixed bag of apples, quite literally. Some probably weren't as strongly flavored as they should be to stand up to molasses but the mix worked well. I added sugar (a bit much for my tastes as I was distracted speaking to some visitors while I added it), cinnamon, cloves, and ginger. I used a rich crust so I dispensed with the butter so often added to a pie. Usually I bake single crust pies in a dutch oven, I've never thought it through, it just seemed to happen that way. Single crusts work better. A pie crust needs to bake not steam and with an apple pie steam it did! Getting the crust to cook well was a challenge. It came out of the oven just over an hour before closing so it was still pretty warm when the tasting commenced. Evidently we all like molasses, everyone who tried it came back for more. It is more rich than a typical apple pie so some people might like smaller pieces, I'm thinking it would also be really nice with a bit of good vanilla ice cream - not quite an 1860's tradition but it sounds good!


Did we live on just pies, turkey and succotash - oh no! There was cake, turkey soup, vegetable soup, rolls from a rice bread dough, plum pudding, boiled indian pudding, apple fritters...and much more I'm forgetting. Definitely a spread that someone might travel over the mountain and through the woods to feast upon.
Monday, October 26, 2009
Bitten by another bug....
Some textile crafts have fascinated me since I was a young girl; I got my first sewing machine when I was about 5, my mother began to teach me to knit when I was 8 or 10, various embroidery techniques were interspersed along the way and spinning has fascinated me as long as I can remember. Weaving is a latecomer to the fascination. Last Fall I tried to take a spinning and dyeing class but it fell victim to the crashing economy. I tried for the same class this year but the timing just didn't work. But, I wanted to find a vacation where I could DO something. I noted that there was a weaving class and decided it sounded like fun and it would be good to learn how fabric is constructed - given how many miles of fabric I have cut up and sewn it would be good to understand it's structure better. And a trip to NH in the Fall sounded perfect. So...
I signed up for Beginning Weaving and Beyond at Harrisville Designs. I did it with some trepidation, that "Beyond" worried me. My only experience weaving involved the most horrific harness loom ever created. 30 odd years ago my Mother gave it to me for Christmas. One end anchored around my waist - fine. The other....well, let's just say "anchor" and "door knob" do not belong together. It was set aside rapidly. I was sure that most in the class would have some experience and I would be lost. As it turned out most of us were beginners and I had nothing to worry about. The class was taught by Tom Jipson, he is as talented a teacher as he is a weaver. He threw a tremendous amount of information at us while keeping us calm and happy. Ultimately, I loved that this was a mixed class. Watching what those who had a clue could do was inspiring. And, as we toiled away on our samplers we got to see them make things - real usable things (though, I confess that I am seriously considering cutting up a sampler or two so I can make something usable). The camaraderie among the students was wonderful too, when a third hand or an opinion was needed one would always instantly materialize. We all wandered the studio checking out other's work - comparing where someone else's creativity took the weaves and how different colors changed their appearance. Warping a loom is a complicated many-stepped process and Tom made sure we were all comfortable doing it before we left. There was a tremendous variation in experience and comfort levels in the class but Tom managed to keep up with all of us, a truly remarkable feat! I managed to finish three samplers, pulling the last off my loom Thursday night. Friday required a quick project. Since I didn't have a loom waiting for me at home I decided to make something, skipping the last sampler. So I made a pretty scarf from Bronson lace. Tom talked me through figuring out how to do the setup and left me with my graph paper until I begged for help, I was way too brain-dead to do math at that point! But I did get my loom set up and my scarf woven and off my loom before the end of the day, I impressed myself and that doesn't happen often.
My scarf:


I was sure I could resist weaving, that I was just there to learn and understand fabric better. My friends knew better, everyone laughed when I got home and told them I want a loom. Just as soon as I figure out where I can stash one I'll be buying one. In class we worked on 22" 4 harness looms, I want something bigger and with 8 harnesses. I figured out quickly what 4 more harnesses will do and I know I'll want one so I might as well just start there.
A bit about Harrisville Designs-
Harrisville is the perfect stereotypical mill town. A quaint little New England town with brick mill buildings and brick and clapboard homes surrounded by hills and ponds all set against a gorgeous backdrop of tree covered mountains. Mills began spinning by water power early here, just a few years after Slater's Mill and manufacturing died almost two centuries later when labor and fashions changed. What sets Harrisville apart from the many other manufacturing towns across New England is that someone saved this town. The last woolen mill closed in 1970, Harrisville Designs opened in 1971. They have saved not just an important part of American history but have kept some small bit of textile production here. While what was once a tremendous part of the American economy and has been almost completely pushed off shore they have continued to produce yarns and looms in New England, keeping American dollars in the American economy. And the owners and staff are all wonderful, friendly people.
More about a week as an itinerant weaver (albeit neophyte) in Harrisville and the town later.
Almost a century after my grandfather entered the textiles manufacturing world I know he would be happy to know that some manufacturing still goes on in New England. And, I'm sure he would be quite amused to know that I am learning to weave on a man-powered machine so like the predecessors to the huge, complicated machines he was familiar with. Maybe once I have a loom I'll have to make a blanket in his honor - "Mr. Blankets" to the home textiles world.
I signed up for Beginning Weaving and Beyond at Harrisville Designs. I did it with some trepidation, that "Beyond" worried me. My only experience weaving involved the most horrific harness loom ever created. 30 odd years ago my Mother gave it to me for Christmas. One end anchored around my waist - fine. The other....well, let's just say "anchor" and "door knob" do not belong together. It was set aside rapidly. I was sure that most in the class would have some experience and I would be lost. As it turned out most of us were beginners and I had nothing to worry about. The class was taught by Tom Jipson, he is as talented a teacher as he is a weaver. He threw a tremendous amount of information at us while keeping us calm and happy. Ultimately, I loved that this was a mixed class. Watching what those who had a clue could do was inspiring. And, as we toiled away on our samplers we got to see them make things - real usable things (though, I confess that I am seriously considering cutting up a sampler or two so I can make something usable). The camaraderie among the students was wonderful too, when a third hand or an opinion was needed one would always instantly materialize. We all wandered the studio checking out other's work - comparing where someone else's creativity took the weaves and how different colors changed their appearance. Warping a loom is a complicated many-stepped process and Tom made sure we were all comfortable doing it before we left. There was a tremendous variation in experience and comfort levels in the class but Tom managed to keep up with all of us, a truly remarkable feat! I managed to finish three samplers, pulling the last off my loom Thursday night. Friday required a quick project. Since I didn't have a loom waiting for me at home I decided to make something, skipping the last sampler. So I made a pretty scarf from Bronson lace. Tom talked me through figuring out how to do the setup and left me with my graph paper until I begged for help, I was way too brain-dead to do math at that point! But I did get my loom set up and my scarf woven and off my loom before the end of the day, I impressed myself and that doesn't happen often.
My scarf:

From the third sampler - Summer & Winter which makes a reversible fabric with the colors in opposites


I was sure I could resist weaving, that I was just there to learn and understand fabric better. My friends knew better, everyone laughed when I got home and told them I want a loom. Just as soon as I figure out where I can stash one I'll be buying one. In class we worked on 22" 4 harness looms, I want something bigger and with 8 harnesses. I figured out quickly what 4 more harnesses will do and I know I'll want one so I might as well just start there.
A bit about Harrisville Designs-
Harrisville is the perfect stereotypical mill town. A quaint little New England town with brick mill buildings and brick and clapboard homes surrounded by hills and ponds all set against a gorgeous backdrop of tree covered mountains. Mills began spinning by water power early here, just a few years after Slater's Mill and manufacturing died almost two centuries later when labor and fashions changed. What sets Harrisville apart from the many other manufacturing towns across New England is that someone saved this town. The last woolen mill closed in 1970, Harrisville Designs opened in 1971. They have saved not just an important part of American history but have kept some small bit of textile production here. While what was once a tremendous part of the American economy and has been almost completely pushed off shore they have continued to produce yarns and looms in New England, keeping American dollars in the American economy. And the owners and staff are all wonderful, friendly people.
More about a week as an itinerant weaver (albeit neophyte) in Harrisville and the town later.
Almost a century after my grandfather entered the textiles manufacturing world I know he would be happy to know that some manufacturing still goes on in New England. And, I'm sure he would be quite amused to know that I am learning to weave on a man-powered machine so like the predecessors to the huge, complicated machines he was familiar with. Maybe once I have a loom I'll have to make a blanket in his honor - "Mr. Blankets" to the home textiles world.
Thursday, September 24, 2009
The many beaded bag
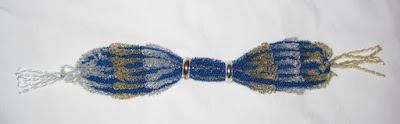 |
I've received so many questions about this little miser's purse that I thought I would put the instructions and my notes online. Purely self-serving as it means I just need to remember a link instead of hunting through my computer looking for an email to forward. This is "Lady's Purse" from the October 1863 Godey's. So far, this is the only publication where I have seen this purse. The technique though seems to have been fairly common, I have seen several for sale online or in antique stores (including one store in MA which had a matched pair!) and in museum collections.
This one is in the Bowes Museum in England,

Unfortunately I don't remember where I found this one. I love the color!
 |
This one is in the Met,
 |
Back to my version:
 |
 |
I knit it with size "E" Gudebrod silk and size 14/0 seed beads, both available from Fire Mountain Gems ,on 0000 needles. The rings came from Lacis. The original instructions called for alternating bands - blue silk with steel beads and white with gold beads. This little thing uses A LOT of beads, not counting the tassels it has about 8000 beads!
The original instructions:
Cast on forty-eight stitches, work four plain rows, then commence the pattern thus:— 1st row.— Make 1, purl 2 together, *, pass down 14 beads, keep them under the thumb, make 1, purl 2 together, make 1, purl 2 together; repeat from *. 2d.— The return row to be worked in the same stitch, but without beads. 3d.— As the first, only pass down 13 beads instead of 14. Every row the same with 1 bead less, until only 2 beads remain; then work the return row, and join on the white silk and gold beads. *, pass down 14 beads, make 1, purl 2 together, make 1, purl 2 together; repeat from *. The other row same as the blue and steel; then repeat the blue and steel once more. This forms one end of the purse . The middle may be worked thus:— With white and gold beads make 1, purl 2 together, pass down 2 beads; repeat; return row plain. Repeat these two rows four times in white, four times in blue, four times in white. Then commence the other end in blue; work the same as before, only commence with 2, and increase to 14 beads. Sew up one-third at each end, and trim with mixed gold and steel tassels.
I made only one change, I added two stitched so I would have an edge stitch instead of doing a yarn over at the ends. So, I started each row with one purl and ended each row with one purl. That also gave me a nice clean edge for seaming it. Stringing the beads is a bit of a challenge, a needle small enough to go through the beads is too small for the thread. If you are stubborn you can get the thread into the needle, otherwise try gluing the end of the thread to stiffen it enough to get through the beads. I strung the beads in sections, estimating how many beads were on the thread and adding many more for goo measure than just snipped the thread and took off the spares before stringing the next set. Due to the nature of how this is knit the beads on the opposite ends will hang slightly differently. Only the most observant people might notice this given the distraction of the many beads.
Pattern published for personal, non-commercial use only
Monday, September 7, 2009
Eeny, Meeny, Miny, Mo
I think I have convinced myself that I need a ball gown. Not that anyone needs a ball gown. I am however indecisive about fabric. I have miles of this silk organdy. I bought it cheap and thought that I could get away with ivory in something so very shear. Uhm, wrong! I just look jaundiced with this on me. So, either I need to pass is on or change its color. My initial dyeing test was pink and was quite unimpressive. The blues I like. I would make a summer sheer out of either in a heartbeat. They just aren't begging to be a ball gown. Not on me. They are too dim in dim light. With very pale skin and dark hair I think I might turn into a floating head. But, they are good colors on me and it would just cost me a few dollars for the dye. I have more than enough for a second day bodice. Though I need another sheer dress like I need a hole in my head.
It might be an easy decision if only this taffeta wasn't calling to me. It's fuchsia shot with white. It's a good color on me, and, it glows in dim light. Yet, it might have enough color to it that I won't look like I'm dressed like a 20 year old. If I get it I'll get enough for a day bodice. Not that I have any need for a silk day dress. But that will add up to a lot of money. All for something I really don't need. But it's soooo pretty.
So, Eeny, Meeny, Miny, Mo. Be good and wear my existing dinner dress, be slightly bad and dye the organdy, or really bad and buy the taffeta??? Anyone have a three sided coin I can toss?
 |
| From Mostly pointless drivel |
It might be an easy decision if only this taffeta wasn't calling to me. It's fuchsia shot with white. It's a good color on me, and, it glows in dim light. Yet, it might have enough color to it that I won't look like I'm dressed like a 20 year old. If I get it I'll get enough for a day bodice. Not that I have any need for a silk day dress. But that will add up to a lot of money. All for something I really don't need. But it's soooo pretty.
 |
| From Mostly pointless drivel |
So, Eeny, Meeny, Miny, Mo. Be good and wear my existing dinner dress, be slightly bad and dye the organdy, or really bad and buy the taffeta??? Anyone have a three sided coin I can toss?
Friday, September 4, 2009
Godey's 1865 Fichu or Necktie
This cute little tie appeared in Godey's in June 1865. It looked simple and different, two things I like. It is quite simple to knit up. It is however kind of wonky to wear. Knit by the direction's row count I came up with a tie just long enough to wrap around my neck and either cross the ends flat or do just a little half knot. It's cute but just doesn't look right for the 60's. It seems to be an accessory before it's time, presaging the higher, frilly and fussy neck adornments of the 70's. It is a great example of how warm lace is if you make it from wool. Somewhat skeptical of how to wear it I crossed the ends and put my brooch on and ventured out for a very cold Candlelight Evening at Old Bethpage Village last December. It was cold enough to flash freeze inches deep mud from the previous day's storm but my neck was toasty, definitely better than a cotton collar that night.
The center ground was knit up in fingering weight wool and size 4 needles and the edge in "scraps" of some lace weight and 0 needles. The stitches are simple, this would make a good introduction to basic lace stitches.
The center ground was knit up in fingering weight wool and size 4 needles and the edge in "scraps" of some lace weight and 0 needles. The stitches are simple, this would make a good introduction to basic lace stitches.
 |
| From Mostly pointless drivel |
 |
| From Mostly pointless drivel |
Wednesday, September 2, 2009
Double Knitting Part 2
The exploration into double knitting started because of a KAL in the cwneedleworkerskal group. The project in question is "Winter cuffs in double knitting" which showed up in Godey's in 1861 and made appearances in several other publications around the same time, http://books.google.com/books?ei=LRGfSoXRLI7ayASroLDuDg&q=%22winter+cuffs+in+double+knitting%22&btnG=Search+Books. Since 19th century patterns offer no clue to what gauge the knitter should strive for I always do sample swatches. There are several ways of doing double knitting, each creating a different fabric. Since there was some debate about the various methods I decided to do a swatch of each. All were done with the same yarn, needles and number of stitches -fingering weight, size 4 (modern size) and 20 stitches.
The first was done with the method used in my original post. To my reading this the technique the writer intended. I got a soft fabric with some nice loft and a reasonable amount of stretch. This would make a cuff which would fit snugly on my wrist. But my wrists are small, most women might need to add a few stitches.
The third method is the easiest to stitch, the yarn is not flipped forwards and backwards you simply knit and slip, and knit and slip. This though produces a garter stitch fabric instead of the stockinette the first version gives. For me it also knit up a good bit tighter.

The first was done with the method used in my original post. To my reading this the technique the writer intended. I got a soft fabric with some nice loft and a reasonable amount of stretch. This would make a cuff which would fit snugly on my wrist. But my wrists are small, most women might need to add a few stitches.
 |
| From Mostly pointless drivel |
Method two has you wrap the thread twice around the needle for each knit stitch. This creates a long stitch and a looser fabric. With my tension this creates something much too open and soft for this project.
 |
| From Mostly pointless drivel |
The third method is the easiest to stitch, the yarn is not flipped forwards and backwards you simply knit and slip, and knit and slip. This though produces a garter stitch fabric instead of the stockinette the first version gives. For me it also knit up a good bit tighter.
 |
| From Mostly pointless drivel |
When I make my cuffs I'll use the first method as the pattern called for. And just because I like red and white I'll likely use the specified colors. First though I need to finish some projects already started. First up to focus on - my pine apple bag from The ladies' work-table book (1845). More on pine apple bags when it's done.

 |
| From Mostly pointless drivel |
Tuesday, September 1, 2009
Newsletter Articles
Months ago I embarked on a grand scheme to write an article a month for the 119th NYSV's newsletter. My plan was to write on civilian life, not just women's lives but all the things from home that the men would have remembered and missed. Many months later I've only written one article, I need to get back to the plan! My thought right now is to post them online, ultimately fleshing out the online version with more complete citation than the shorter published version. That will also let me update them as new information is found. The first article was about the weekly rhythms of life in the home. Here is the original version of Routines of the Week, more cites to come at a later date. http://mysite.verizon.net/bachamberlain/This_is_the_way_we_wash_our_clothes.pdf
Saturday, August 22, 2009
Double Knitting
Note - I've used two colors to enhance visibility. This is NOT how to do two color double knitting. The mess of ends you see is a result of the two colors, you won't have all of those tails doing one color.
Side A
Side B (note the odd green stitch is a mistake)
Cast on the required number of stitches and do any foundation row. You need to have a number of stitches that are a multiple of two.
Do any edge stitches as the pattern calls for.
Knit one, tail is hanging to the back as with usual knit
Bring the yarn forward as if for a yarn over. You're passing it under the right hand needle so it hangs in the front as if for purl
Slip the next stitch, inserting the needle as if you are going to purl the stitch
Move the yarn to the back, passing under the needle again. The thread will cross horizontally across the slipped stitch
Knit the next stitch and repeat the slip across the row.
Row 2
Repeat the same process. The stitches you knit on the last row will now be slipped, and the previously slipped will be knit.
Knit
Pass yarn to the front
Insert needle as if to purl
Slip stitch onto the right hand needle
Pass yarn the back, across the slipped stitch and under the right needle
Continue pattern across row.
If you don't do any plain knit rows at the finishing end you have a one ended tube. You can castoff in a way that keeps this open.
Side A
 |
| From Double Knitting |
Side B (note the odd green stitch is a mistake)
 |
| From Double Knitting |
Cast on the required number of stitches and do any foundation row. You need to have a number of stitches that are a multiple of two.
Do any edge stitches as the pattern calls for.
Knit one, tail is hanging to the back as with usual knit
 |
| From Double Knitting |
Bring the yarn forward as if for a yarn over. You're passing it under the right hand needle so it hangs in the front as if for purl
 |
| From Double Knitting |
Slip the next stitch, inserting the needle as if you are going to purl the stitch
 |
| From Double Knitting |
Move the yarn to the back, passing under the needle again. The thread will cross horizontally across the slipped stitch
 |
| From Double Knitting |
Knit the next stitch and repeat the slip across the row.
 |
| From Double Knitting |
Row 2
Repeat the same process. The stitches you knit on the last row will now be slipped, and the previously slipped will be knit.
Knit
.JPG) |
| From Double Knitting |
Pass yarn to the front
 |
| From Double Knitting |
Insert needle as if to purl
 |
| From Double Knitting |
Slip stitch onto the right hand needle
 |
| From Double Knitting |
Pass yarn the back, across the slipped stitch and under the right needle
 |
| From Double Knitting |
Continue pattern across row.
 |
| From Double Knitting |
If you don't do any plain knit rows at the finishing end you have a one ended tube. You can castoff in a way that keeps this open.
 |
| From Double Knitting |
Subscribe to:
Posts (Atom)